This DIY garage gym storage rack was built by Kaley Pugh and her husband, Byron. If you’ve followed me for any amount of time, you know I’m a big advocate of an organized gym space. Whether it’s an off-the-shelf (no pun intended) storage setup like the Titan Fitness Mass Storage, the Rogue Fitness Universal Storage, The Rep Fitness Storage System, or a simple DIY project, having an organized space will do wonders for efficiency and aesthetics.
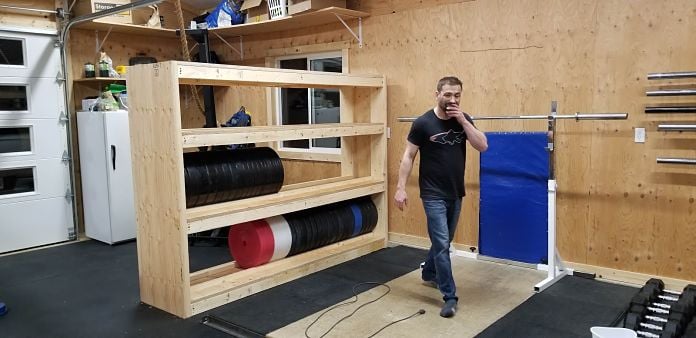
When I came across Kaley and Byron’s DIY storage rack I was immediately impressed. It is very well laid out and it utilizes nearly every surface. Not to mention it’s 8 feet long and 6 feet tall… talk about storage! For less than $350 USD ($450 CAD), you can build something similar and take your organization game to the next level.
The following section was written by Kaley. You can follow her @kaleypugh.
Introduction
I’m a weightlifter and CrossFitter, and had several sets of bumper plates, kettlebells, dumbbells and assorted other bits and pieces cluttering up our home gym. Luckily, my husband is a pretty handy guy, and built us a sweet storage system to organize the chaos, with a total material cost of about $450 CAD. I thought I’d share some photos and general instructions for others who can handle basic tools and need to store their gear.
We didn’t cut/measure/build to fine furniture standards, so if you’re extra picky about the tiny details, keep that in mind and triple check your own dimensions, measurements and cuts. Also, we take no responsibility for the safety of this unit – build and use at your own risk!
The dimensions are 8′ long x 2′ wide x 6′ tall.
Materials
- 12 – 8′ 2×4
- 4 – 8′ 2×8
- 2 – 8′ 2×2
- 2 sheets of 1″ construction-grade plywood for shelves
- 1 sheet of 3/4″ construction-grade plywood for ends
- Assorted fasteners (2 1/2″ x 5/16″ GRK fasteners, 2 1/2″ deck screws, 3″ deck screws)
- 10 each of 3/4″ galvanized floor flanges
- 6″ threaded nipple and cap for the posts
Instructions
We have two kinds of shelves; two with 2×2″ railings to keep bumper plates in a vertical orientation, and two flat ones. We’re keeping the heaviest stuff on the bottom, for what I hope are obvious reasons. The bottom shelf sits right on the floor.

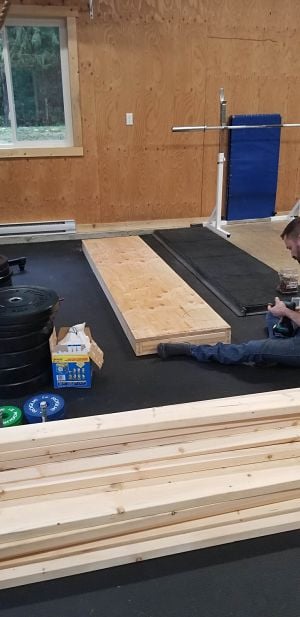
We had the lumber yard rip the 3 plywood sheets in half length wise, so are working with 2’x8′ plywood pieces throughout. Start by assembling the 2×4 frames for the shelves, with 3 short cross pieces of 20 7/8″, for a total shelf width of 24″ (may be a bit deep if you’re only accessing the unit from one side…). We didn’t cut the 2×4 8′ to length, so this is one place when the measurements and final alignment aren’t completely precise…if it bugs you, cut the 2x4s for the long sides of the shelf to match your plywood exactly. All joints are deck screwed and also fastened with GRKs…I figured we have over 650lbs of kettlebells and dumbells alone, so we built strong!

Add the plywood sheet to the top, and repeat for the other 3 shelves.

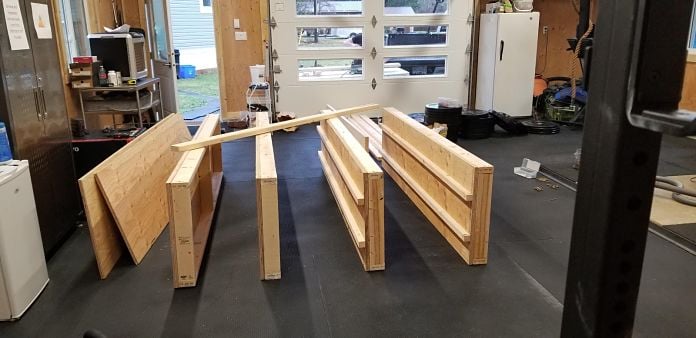
Our bottom two shelves have 2×2″ railings to stop the bumpers from rolling around. We went with 9″ between the railings, centered on the shelf. Here’s a picture of the railings and corner showing what we did for fasteners.

We aren’t tall people, so wanted to minimize the total height of the unit/height of the top shelf. For shelf spacing, we went with 20 inches for the bottom two that will have bumper plates so that the plates can roll out over the railing without smashing your hand on the shelf above. I went with 14 inches for the third space (based on our biggest kettlebell, before I realized that I don’t actually want to lift a 70 lb kettlebell onto a 4.5 foot high shelf!), and it works nicely. At two 20 inch spaces, one 14 inch space, and 4 shelves with a total height of 4 3/4″ each, the total height of the unit should be 73 inches. We did a rough layout of the 4 assembled shelves to check spacing, height, etc.

The 2x8s are the vertical supports for the shelves, attached to the outsides of the short edge of the shelves. Make sure the vertical 2x8s are plumb at every step/layer! The plywood end sheets go on the outside of the 2x8s, leaving a little 2 inch gap – add a block or something if it’s going to bug you, but we left it cuz “we aren’t building a church” as a friend’s Dad used to say. We made some 20 and 14 inch 2×4 blocks to support the shelves during the assembly process. The shelves are heavy! Fasten the heck out of the shelf-to-2×8 joints. We considered adding a middle vertical 2×4 support to the outsides of the long sides of the shelf, or 2×4 center posts between the layers.


Add the 2×8′ 3/4″ plywood end pieces. Consider fastening the unit to the wall if you can, depending on your space.

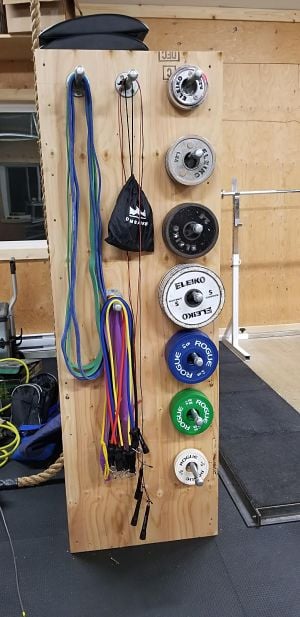
We also built little posts out of 3/4″ galvanized floor flanges, 6 inch threaded “nipples” and end caps, for storage of change plates, skipping ropes, mobility bands, etc. on the end wall of the unit. I used 10.

And now the fun bit – organize to your heart’s content! As you may have noticed from the pictures, we played with a couple of different arrangements of plates, dumbbells, etc. We ended up putting all of the bumpers on the bottom, and left the 2×2 railing on the second shelf to help secure kettlebells.


I’d like to thank Kaley for sharing this build with the home gym community. It’s a heavy-duty beauty of a storage rack!
If you have any questions/comments about this storage setup, please leave a comment below.
If you found this DIY project useful, please feel free to share it on social media!
The bar is loaded,
Adam

